
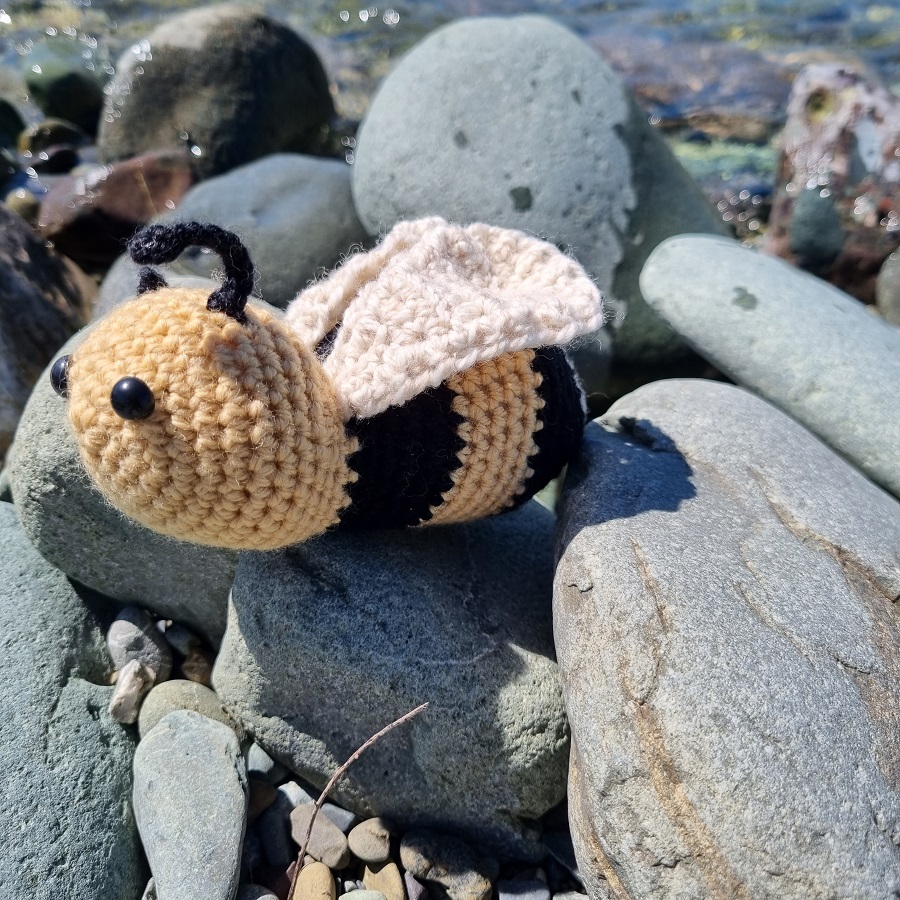
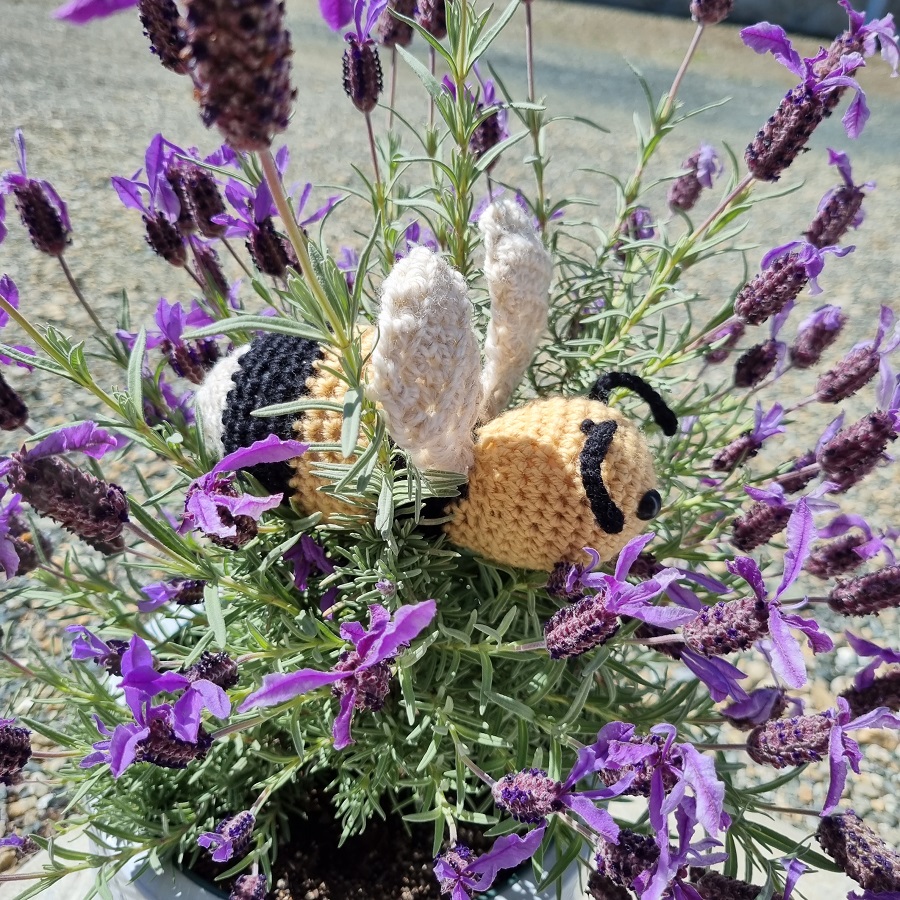
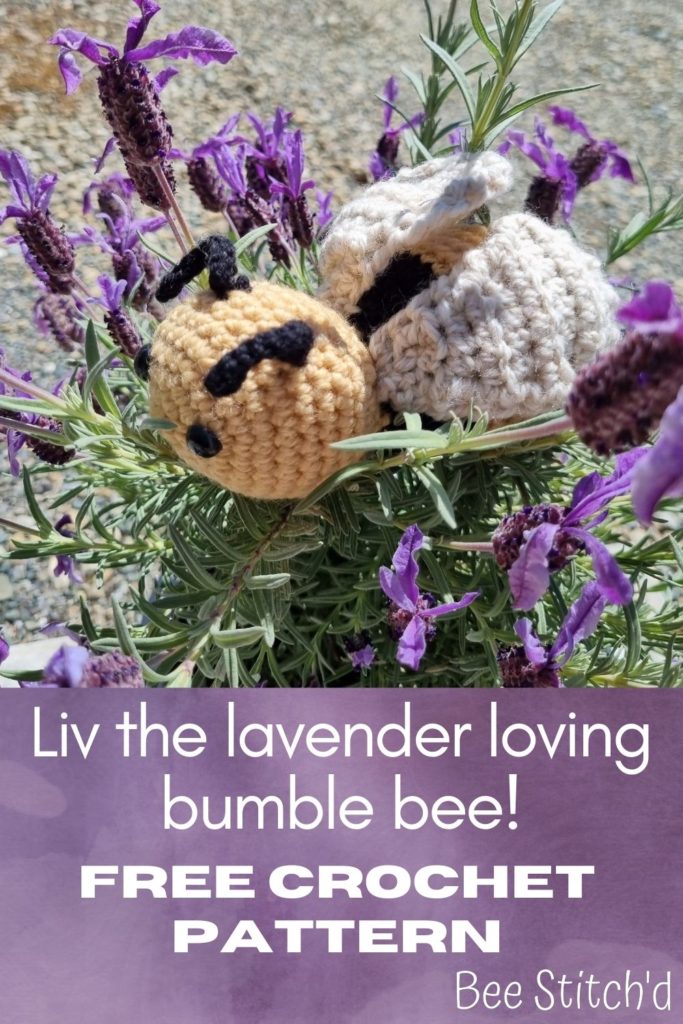
Bees and lavender just go together in my head. I used to spend many summer afternoons sitting next to the lavender bush watching the bees fly around. Let’s be real- as I’m sitting here writing this post, I’m sitting next to a lavender plant covered in real bees! (And the one you see in the photo).
I love bees and that’s part of the name of this blog! So here’s Liv, my take on a crochet bumble bee!
This pattern will start with the US terminology, scroll further down if you need the UK version!
*This post may include affiliate links. When you purchase items from these links, we will receive a small commission, at no extra cost to you, to help support this website. Thank you for your support! Read more ->
Save this to your notebook on Ravelry!
Crochet Bumble Bee Overview
Keep in mind that you don’t have to use the weight of yarn that I use, or the hook size. Just use a hook size down than what’s suggested on the sleeve of the yarn ball for the body!
What You’ll Need:
3 colors of yarn of 8ply (double knit). For more traditional bee colors, yellow, black, and cream. These are the colors I’ll be referencing in the instructions!
My yarn totals I used are 12g (25 meters) black, 12g (25 meters) yellow, 10g (20 meters) cream. Be sure to have a little extra just in case you use more than I do or if my scale/math is slightly off.
3.00 mm crochet hook
4.00 mm crochet hook
Darning needle
2 safety eyes (learn about safety eyes here)
Stitch marker!
Scissors
Stuffing
Optional:
Pins – these are also helpful for figuring out where things go on the bee (like the antennae and wings)
Fishing wire or thin wire to stabilize the wings
Finished size: 6.5 inches (16.5cm) long, and 3inches (8cm) tall/wide. This is a cute and fairly small bee!
Gauge: does not matter for this pattern!
Amigurumi Bee Instructions (US Terminology)
Terms
Ch = chain
Sc = single crochet
Inc = 2sc in one sc space (or for the wings, 2hdc in one hdc space)
Dec = decrease (1 sc in 2sc)
Hdc = half double crochet
Sl = slip stitch
Pattern
This pattern works in a continuous round.
Need help with color changes? Read this article for seamless color changes in crochet! Try to make sure the color changes are on the inside of the project so you have less weaving to do and for a cleaner look.
And learn how to do invisible decreases here!
The Head And Body
Use the 3mm hook for this.
Row 1: With yellow, make a magic loop. 6 sc in the magic loop. (6)
Row 2: Inc around (12)
Row 3: Sc, inc around (18)
Row 4: 2sc, inc around (24)
Row 5: 3sc, inc around (30)
Rows 6-11: sc around (30)
Row 12: 10dec, 10sc (20)
Row 13: 5dec, 10sc (15)
Row 14: Change to black, sc around (15)
Row 15: sc, 5inc, 9sc (20)
Row 16: 2sc, 10inc, 8sc (30)
Rows 17-18: sc around (30)
Rows 19: change to yellow, sc around (30)
Rows 20-23: sc around (30)
Row 24: change to black, sc around (30)
Row 25: sc around (30)
Row 26: 3sc, dec around (24)
Rows 27-28: sc around (24)
Add the safety eyes and start stuffing the body. I added the eyes between rows 3 and 4, with 5 stitches between them. Have the flat part of the bee as your bottom (the part that didn’t have decreases around the neck)
(I find it helpful to stuff and add the eyes on the outside, then take the stuffing out to put the backs on).
Optional – bring your crochet bumble bee to life with a crochet heart!
Row 29: Change to cream (or yellow if you’d prefer) – 2sc, dec around (18)
Row 30: sc around (18)
Row 31: sc, dec around (12)
Row 32: sc around (12)
Finish stuffing the bee now
Row 33: dec around (6)
Tie off and weave in the ends!
Antennae (Make 2)
Using black and a 3mm hook,
Start with a long tail (or at least 3 inches) and ch 10
In the second ch from the hook, sc. Sl the rest of the chains (1sc, 8 sl). Fasten off and leave a tail to tie on.
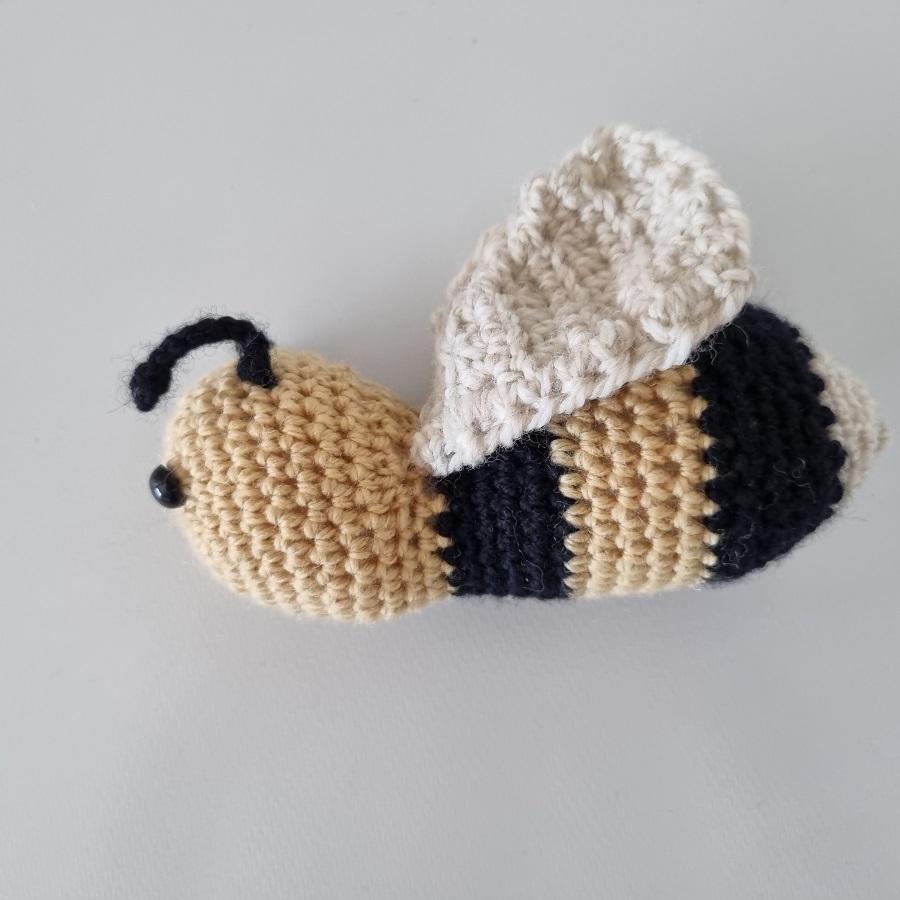
Wings (Make 2)
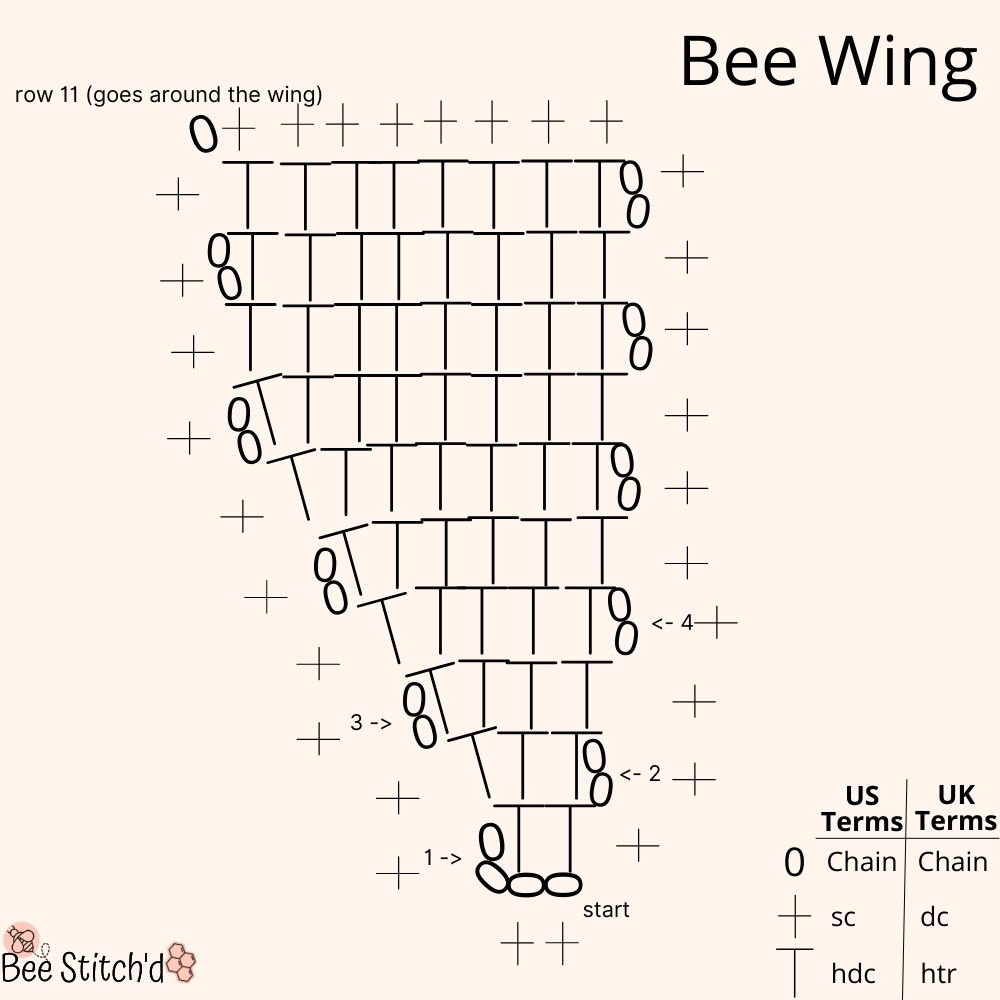
Using cream and a 4mm hook
Chain 4.
Row 1: In the third chain from the hook, hdc. Hdc in the last remaining chain. (2)
Row 2: Chain 2 (this does NOT count as a hdc), hdc, inc. (3)
Row 3: Chain 2, inc, 2hdc (4)
Row 4: Chain 2, 3hdc, inc (5)
Row 5: Chain 2, inc, 4hdc (6)
Row 6: Chain 2, 5hdc, inc (7)
Row 7: Chain 2, inc, 6hdc (8)
Rows 8-10: chain 2, 8hdc (8)
Row 11: This is worked around the entire wing instead of in the row. Ch1, sc around the entire edge. Go the opposite direction with the sc on the 2nd wing,
(so one you would start working on the edge of the hdc/chains, and the other wing you would start with the last hdc row worked).
Tie off, leaving a tail to sew the wings onto the body with.
Putting the Bee Together
I love/hate this part of crochet. On one hand, you get to see your crochet bumble bee come together, but on the other hand you have to sew things together.
This is also partly why I’ve made the bee body and head in one piece, fewer pieces to sew together!
Start, if you haven’t already, by weaving in any ends from the body. You don’t need them!
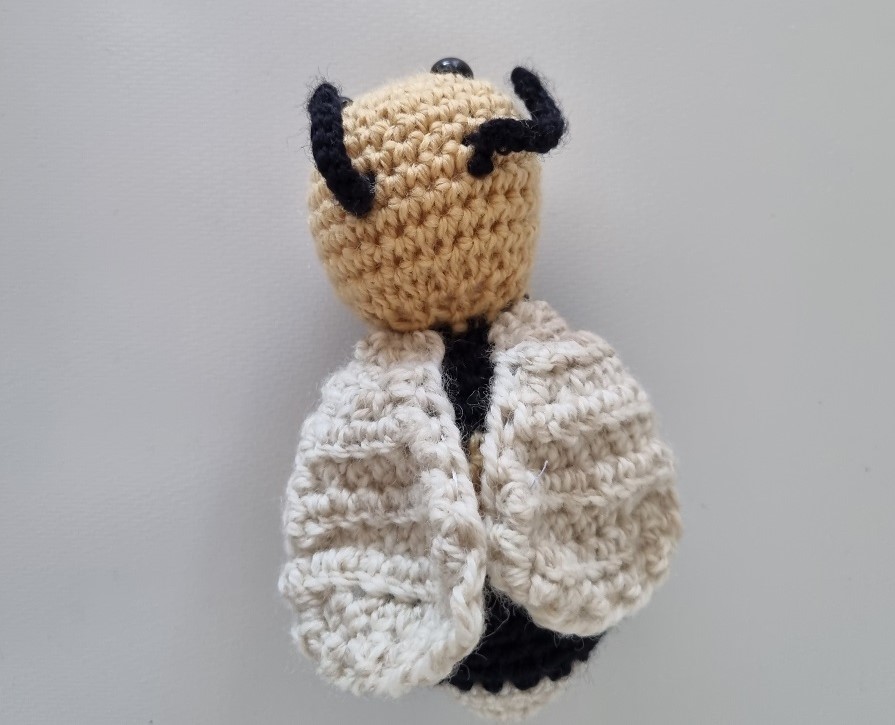
Attach the Antennae

Put the antennae almost in line with the eyes, about 5 rows back from where the eyes are. Tie on and weave in ends.
The Wings
Something I did with the wings is weave some fishing wire along the border of the wings, to allow it to hold a shape better. This is completely optional.
Find the center of the body, following a straight line from the middle of the eyes to the body. I like to mark this spot with a pin so I only have to find it once. Have the increase side of the wings in the center, the flat side on the edge of the bee.
Place the wings with about a 3 stitch gap between them, and sew onto the first row of the black stripe of the body. Tie off and weave in the ends.
And you’re bumble bee is finished!
Crochet Bumble Bee Instructions (UK Terminology)
Terms
Ch = chain
Dc = double crochet
Inc = 2dc in one dc space (or for the wings, 2htr in one htr space)
Dec = decrease (1dc in 2dc)
Htr = half treble
Sl = slip stitch
Pattern
This pattern works in a continuous round.
Need help with color changes? Read this article for seamless color changes in crochet! Try to make sure the color changes are on the inside of the project so you have less weaving to do and for a cleaner look.

The Head And Body
Use the 3mm hook for this.
Row 1: With yellow, make a magic loop. 6dc in the magic loop. (6)
Row 2: Inc around (12)
Row 3: Dc, inc around (18)
Row 4: 2dc, inc around (24)
Row 5: 3dc, inc around (30)
Rows 6-11: dc around (30)
Row 12: 10dec, 10dc (20)
Row 13: 5dec, 10dc (15)
Row 14: Change to black, dc around (15)
Row 15: dc, 5inc, 9dc (20)
Row 16: 2dc, 10inc, 8dc (30)
Rows 17-18: dc around (30)
Rows 19: change to yellow, dc around (30)
Rows 20-23: dc around (30)
Row 24: change to black, dc around (30)
Row 25: dc around (30)
Row 26: 3dc, dec around (24)
Rows 27-28: dc around (24)
Add the safety eyes and start stuffing the body. I added the eyes between rows 3 and 4, with 5 stitches between them. Have the flat part of the bee as your bottom (the part that didn’t have decreases around the neck)
(I find it helpful to stuff and add the eyes on the outside, then take the stuffing out to put the backs on).
Optional – bring your crochet bumble bee to life with a crochet heart!
Row 29: Change to cream (or yellow if you’d prefer) – 2dc, dec around (18)
Row 30: dc around (18)
Row 31: dc, dec around (12)
Row 32: dc around (12)
Finish stuffing the bee now
Row 33: dec around (6)
Tie off and weave in the ends!
Antennae (Make 2)
Using black and a 3mm hook,
Start with a long tail (or at least 3 inches) and ch 10
In the second ch from the hook, dc. Sl the rest of the chains (1dc, 8 sl). Fasten off and leave a tail to tie on.
Wings (Make 2)
See the image above in the US term version for a chart of this.
Using cream and a 4mm hook
Chain 4.
Row 1: In the third chain from the hook, htr. Htr in the last remaining chain. (2)
Row 2: Chain 2 (this does NOT count as a htr), htr, inc. (3)
Row 3: Chain 2, inc, 2htr (4)
Row 4: Chain 2, 3htr, inc (5)
Row 5: Chain 2, inc, 4htr (6)
Row 6: Chain 2, 5htr, inc (7)
Row 7: Chain 2, inc, 6htr (8)
Rows 8-10: chain 2, 8htr (8)
Row 11: This is worked around the entire wing instead of in the row. Ch1, dc around the entire edge. Go the opposite direction with the dc on the 2nd wing,
(so one you would start working on the edge of the htr/chains, and the other wing you would start with the last htr row worked).
Tie off, leaving a tail to sew the wings onto the body with.
See above for instructions on putting together!
Now you have your own Liv the lavender loving crochet bumble bee! Don’t forget to save this to your notebook on Ravelry!
